Good evening, and welcome. For my new followers, I will be attempting to list your blogs here - once I return home, and can add your names & blogs to the database I keep of my following list (and I don't know how to do that for those who follow via Bloglovin). I think there might be some blog candy in the near future, and I use that numbered database with the Random Generator thing-y in order to know who the lucky number is! So if you follow here via bloglovin, I'd sure appreciate a heads up with your name and your blog name, so I can be sure to include everyone when I do some candy!
OK! I hope everyone had a wonderful Thanksgiving (and if you don't celebrate the day as a holiday as the USA does, at least I hope you had something you were thankful for). In my case, of course, my sweet husband & daughter, son-in-law, granddogs and I still have 3 of my 5 brothers living. And so very many other blessings.
Several bloggers and some local friends who winter in Florida had suggested we visit Violette's Scrapbooking in Lakeland. I hesitated at first, as this city is about a 1 1/2 hr drive from where the DD lives. DD had to work today, so DH suggested a drive to find the place. We didn't set off real early, but we got there in plenty of time to browse a really wonderful & extremely well stocked store; very attractive displays in a well lighted, spacious - multi-roomed store. Oh My Goodness! I was pretty bad today, because there was a good supply of Northwoods stamps - which I love; some wonderful dies. (- Nope I don't like dies...NOT MUCH I DON'T!) DH is very good to hunt around, bring me back things he thinks I'd like. So we had a lot of fun. And No, I did NOT buy any paper here. :-)
I will have to say this, and perhaps I should not: We did not find this store to be as friendly as Sparkle N Sprinkle. We were greeted when we entered, but no one asked if there was anything specific we might be interested in, no offers to demonstrate any products, etc...Not a big thing of course, but since the visit to S/n/S earlier in the week was such a delightfully friendly visit, we both noticed the difference. DH talked with the lady who was manning the store, and informed me that she was not the owner. That may have made the difference, I don't know. This evening I chatted with a friend on FB who had suggested the visit, and her experience was totally different from ours today. There were not that many other customers - no Black Friday sales - which was ok by us. The sales person was kind enough to make a copy of 3 cards for me, since I had forgotten a camera, but we did have to purchase the stamps in order for her to do that. She was pleasant, just not especially welcoming, we felt. Like I said, I'll try to be honest in my opinions of things on any post I make. Not to say I'm gonna be right..but it's what I think! Overall, we did enjoy our visit, and yeah, I left a chunk of change. We'll call it an early Christmas present. From me to me! :-)
So g'night. Have a wonderful weekend. I'm told it is to be in the 80's tomorrow...typical Florida winter weather. Yay! Hugs from me to you.

11/29/2013
11/27/2013
Happy Thanksgiving
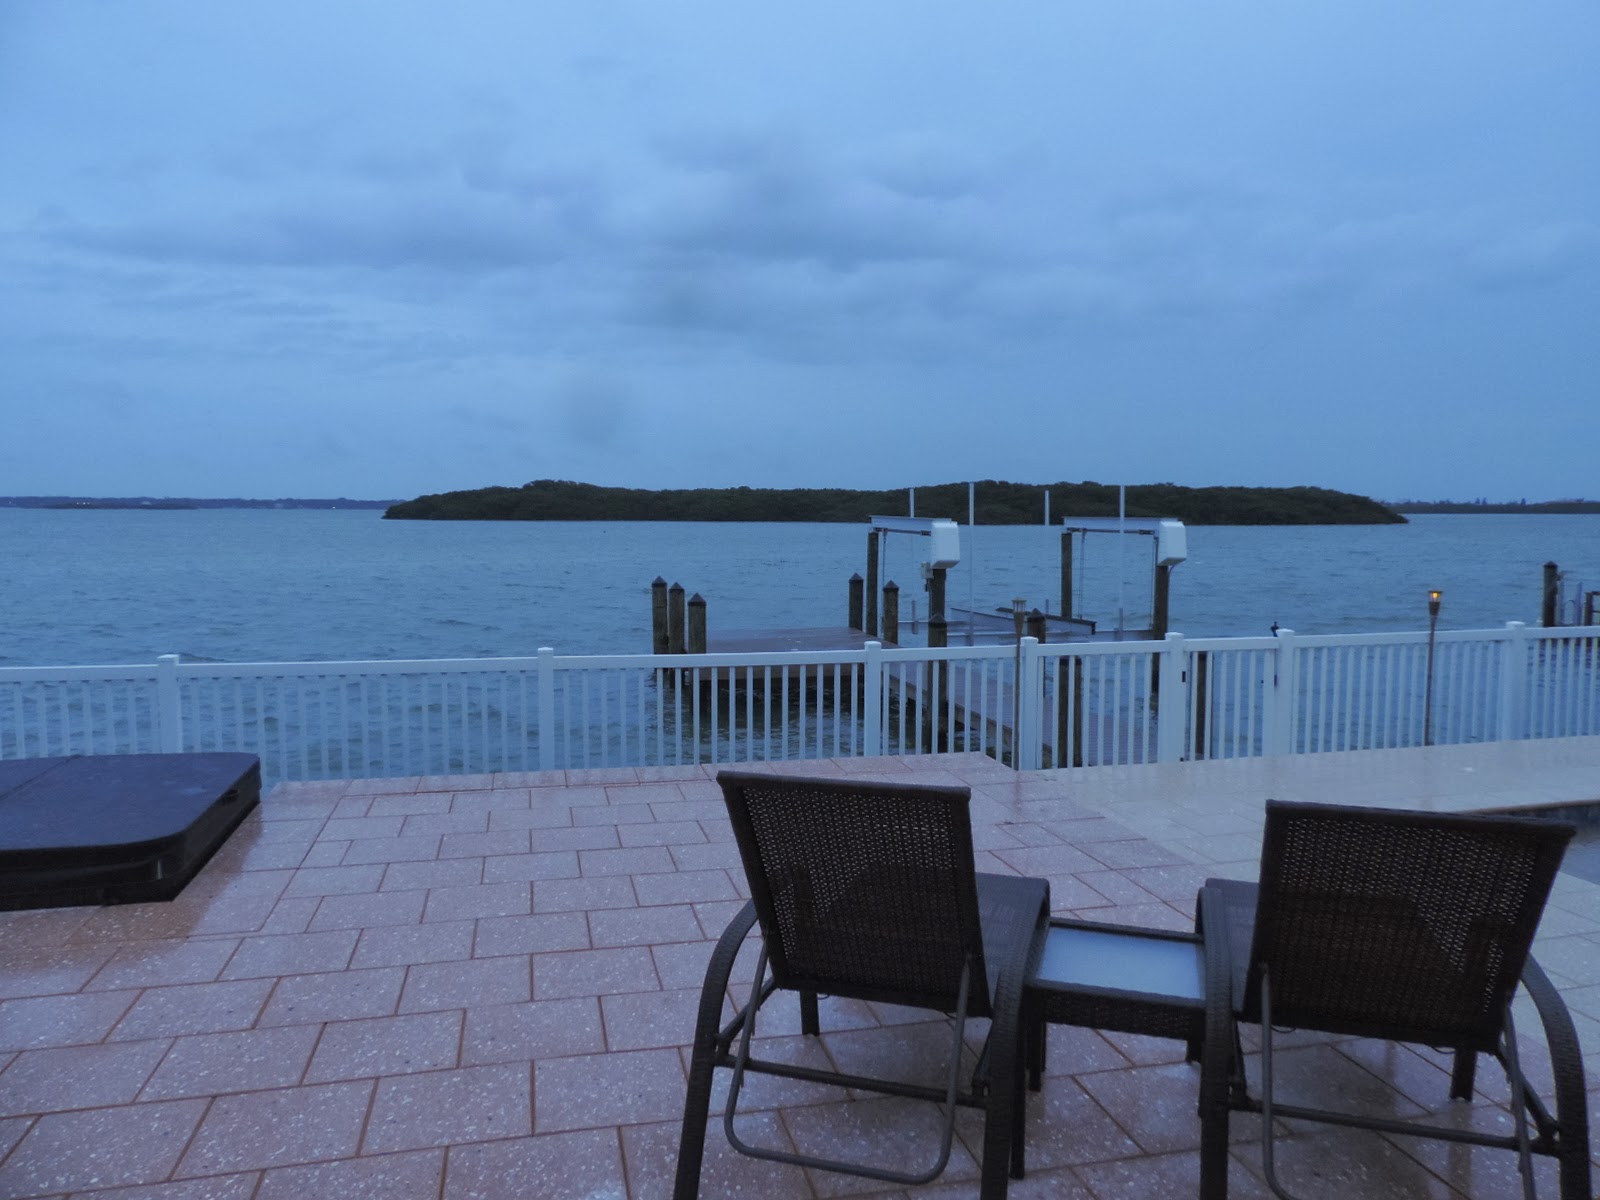
Good evening from finally sunny Florida. The sun did come out this morning, but it has been quite windy all day. The temperatures were pleasant early in the day, but mid-afternoon, had begun to drop. We finally got our predicted thunderstorm & rain last night, so I closed up computer operations about 10pm, and went to bed and read for a while. Earliest I've been to bed in a long time.
Here's a couple of pictures (same view as yesterday - ) with the sun shining. The water looks like diamonds were dropped it was so sparking.

The sky was not the gray lead of yesterday, but still had not gotten the pretty blue I love to see. It did have that luscious blue later in the afternoon in the 2nd picture. Oh yes, DD said what I thought was a bird in my water picture of yesterday, was just a buoy out in the water.

This is what Florida should look like! But as anyone who has ever visited here knows, it rains & gets gloomy & chilly in South Florida too. Fortunately for us, we lived here long enough that we don't get that upset with the weather. We got a phone call from relatives who live in our subdivision that snow flurries were happening there, so the Florida gray looked better than what it must be at home!
Got out & about today and headed for Ruskin, Fla. to visit a store called Sparkle n Sprinkle, a lovely place a blog follower (KathyK) had told me about. To get there, we had to cross the famous Skyline Bridge in Tampa (maybe it's called Skyway..I'm not certain). Anyway, I really dislike having to drive over it! I was in the back seat, DD was driving, and it was very windy. We could feel the wind buffeting the car. Needless to say, I closed my eyes and said "Tell me when we get down". She took pity on her ole Mom and we came home another way.
It's not a large store, but oh my, was it packed with goodness. Lots of products that were new to me. The owner, Margaret, was so friendly and welcoming, knows her stock and knows how to use the products too. We did a fast make & take which I enjoyed and will try to share here. She explained how to use any number of new products and if I forget, there's an online gallery where I can refresh the instructions. I behaved myself pretty well (relatively speaking) and had such a great time.
After leaving Sparkle, we headed back to Tampa, stopped at Ikea to pick up a couple of small shelves for the cabinet over our laundry sink. The shelves are always cluttered and I had seen these small metal shelves last visit (got 2 for my kitchen cupboards and they work well). Daughter picked up a few things, and we had lunch in their cafeteria. It wasn't a 'great' lunch, but pretty good - and we were hungry.
I've had the laptop cluttering up the table while we've been here. Since tomorrow we will be using it to have the holiday meal, and since the SIL is arriving home tonight, I'll have to clear up my clutter. Might not be back to chat tomorrow evening.
Oh yes, I am missing the fun at the last Rudolph Day of 2013, and the fun at Pixie's Snippet Playground to celebrate the 100th Snippet week. I have to dash over & see how long that is going on...maybe it will still be running by the time we get home, and I can submit a card. I would urge you to check out both these lovely blogs for some extremely inspirational cards, because as we all know, Christmas is not that far away. (well at the Playground, your card just needs to have snippets, but there will be a lot of holiday cards I can assure you!)
So, from my family & me, to all of you & your families - Happy Thanksgiving, if you celebrate that day. If not, well all of us have many things for which to be thankful for, so Thankful Blessings to all of you who don't celebrate the day as a USA holiday. Thanks for joining me.
11/26/2013
Hi from Florida

Good evening. I remembered to bring my camera USB connection on this trip, so this afternoon, after we got back from lunch & shopping, I stepped out on the deck to take some pictures of the gloomy gray day. It was misting & drizzling rain as I snapped these and the little blob you can see in the water, is some kind of water bird I think. I didn't see anything until I looked at the imported pictures. Actually, I was hurrying the dogs along, and just snapping some photos.
We found a new scrapbook store this afternoon, which we had spotted as we were coming to the DD's house Sunday evening. Since she knew where it was, we checked it out today - Scraps of Art in Seminole, Fla. I don't scrapbook, so I never know if I'll find 'my kind of schtuff' in a scrap store. I had a very pleasant visit, and found way too many goodies. Some lovely Christmas papers (and YES, I DID NEED more Christmas papers TOO!), some nice Stampendous stamps, and some other supplies. We had intended to drive about 45 minutes to Ruskin, Fla. to visit Sparkle & Sprinkle, but some thunderstorms had been predicted this afternoon, and we decided to stay closer to home. Maybe we can get up to Sparkle & Sprinkle tomorrow, since one of my blog followers had told me about it after our last visit to DD in October.
Of course I had to check out a Michael's & JoAnn's...after promising myself I'd stay out of those stores. I did find a couple of new MS border punches..at least I've not found them in my local stores. We also managed to visit Bed, Bath & Beyond & a Home Goods store (like Marshall's if you aren't familiar with this store). Home Goods is the sort of store that you visit, not be looking for anything specific, and can find all kinds of nifty things like pretty towels, dinner ware, dust collectors - that type of thing. Then we had a nice late lunch; everyone had leftovers from yesterday's lunch + today's lunch, and we didn't have to think about what to have for dinner = which made my kinda day!
I hope your day was pleasant too. That if the weather is nasty where you are, that you were able to stay inside, cozy & warm, either crafting to your heart's content or dozing by the fire. Thanks for stopping in for a visit, and Hugs from me to you. Be safe if you are traveling for the holiday.
11/25/2013
Hello from Florida
Good evening & welcome to some new followers. How delightful see your faces appear in the following list. Once I'm at home again, I'll give a proper shout-out and try to list your blogs so that Carolina Cards' visitors can pay a visit.
We had an easy ride south Sunday from South Carolina down to the Tampa, Florida area where our DD lives. Traffic was not terrible, and we didn't encounter any road construction or slow-downs as can frequently happen on the route that we take south.
Left 30F & windy temperatures at home (and the wind made it feel much, much colder) to arrive in mid-60 temps, but still very windy. Today was quiet, overcast and the waterway outside DD's house, was very choppy. No dolphins playing today, and very little boat traffic on what is usually a very busy waterway. DD had a business meeting during the morning, but when she came home, we went out for a while to have a lovely lunch. The restaurant has an Italian grocery in the same building, with some luscious homemade bakery items - not the sort you can find in a typical bakery, but strictly the kind of Italian desserts that you just drool over, and can't decide which to select. We brought some home after eating our lunch. The place was terribly crowded as well, so I can't begin to imagine how it will be on the day prior to Thanksgiving.
Stopped at a couple places for errands on the way home (dog food at 2 different places for one thing!), and it was nearly dark when we got back to the house. I don't like the early darkness of late fall & winter. I understand we're to get a cold front moving in, but can't complain...just saw on MSN weather that there may be an icy rain at our home!
Just wanted to pop in & say Hi this evening. No cards to share. I brought some copics and stamped images to color, but also brought some dvds I've been wanting to view; I can watch those on the laptop while everyone else watches tv. So goodnight, and I'm going to try to get around to pay some visits. Thanks for stopping tonight, and Hugs from me to you!
11/22/2013
Friday Fun Day - Thankful
Good afternoon, and since it is Friday, of course there is a Fun Day Challenge 27 over at Jo's Scrap Shack. The theme was Thankful and Team A is being sponsored by Stamp Art. Since I did not get the sponsor's digi requested in time to prepare a card for today's challenge, I selected an old stamp of my own, just so that I could join in.

- Cornish Heritage Farms Fall Harvest image; this stamp was purchased from the original company. I think another company bought the business and I'm not sure if this image is still available. Stamped on Xpress paper, using Versafine Vintage Sepia. After using Versafine to stamp, I heat set the ink as I planned to do a little copic coloring. Memento inks work best for me with copics, no heat setting, no smudging. Since this stamp has lots of dark on it, I wanted to use the Vintage sepia. Happy to report, I didn't have any smudging problems.
- die cut with a new SU Top Note die, which looks like S/B Labels 8 to me, just a bit. However, I liked the Top Note for the pen stitching round the edges. Also, I tried to use a Label 8 for matting, and folks, they don't match up on the scroll bits! So I did a faux mat, just tracing the outside of the die cut piece, enlarging a bit.
Image & mat were both smudged with DI Tea Dye, Vintage Photo. Used dimensional tape to mount on card base.
Card base was cream c/s, also smudged the same DI's around the outside with the sponge applicator tool. After looking at the color against the image & mat, came back in with Evergreen Bough because I wanted a little contrast in the earth tones. Liked that better.
Sentiment is a snippet of cream, stamped with an IO clear stamp from the Count Blessings set. Used Memento Teal Zeal. Colored 2 pearls with copics in BG shades, and that's it for this card!
Please join us over at Jo's Scrap Shack and let us share in what you may be thankful for. I was honored to select the theme for today, and since our USA Thanksgiving is next week, thus my choice of theme. However, realizing we have a lot of international folks who play along, I didn't want to choose something USA specific. I think we can ALL be thankful for the good things in our lives, no matter where we live. So - jump over to Jo's, where the rules are posted and very simple, and help us all say Thanks!
I will have another post today, because I'm thankful for some lovely new followers. I was trying to list them at the top of this blog, but was having so much trouble with formatting. I finally decided, Heck, quit messing about with it, do in a separate post! So thanks once more for joining me here. I'm so blessed to have many, many things in my life to be especially thankful for. All of you lovely bloggers who have joined here, been so kind & encouraging - would be at the top of my list. Of course my family & being a child of Christ, tops the list! Hugs from me to you.
Miscellaneous
Hello. I wanted to finally be able to say a huge thank you to some new followers.
Gail - I Like Paper
April Stampwilly Designs
Carol CM Designs
Melissa Moe Creations
Gail - I Like Paper
April Stampwilly Designs
Carol CM Designs
Melissa Moe Creations
Marilyn Who 'Dat Scrapper
Erin Erin's Owl Nest
|
11/21/2013
3 Twenty Crafts - Tags & Trimmings
Good afternoon and a big welcome to our 4th and final day of Jo’s Scrap Shack’s Surprise Blog Hop!
All week long the design team and I have been showing stamp sets from a new company - 3 Twenty Crafts. We hope you have had fun hopping along all week with us and enjoyed all the wonderful projects that the design team created. Remember that all the stamp sets you saw this week will be available to purchase today at 3pm and will be shipping on Monday.
Today we are showing you the new and awesome stamp set “Tags and Trimmings”

Here is my card created using this stamp set

This was a pretty fast card, once I remembered I had some Paper Cuts card blanks purchased years ago. The longest part of the process was trying to find the card blanks! When I saw this stamp set, I knew the tiny images were perfect for this type of card, for inchies, stamping on tags...very versatile. I chose the candy cane & ornament, stamping them with Colorbox Fluid Chalk ink.* Easily colored the red stripes with copics; covered that with a red Silver Star gel pen for sparkle, then a white touch with a Signo pen for highlights. Added the bows after adhering the circles to card.
Ornament stars colored with Spica gold, then a yellow Silver Star pen. Colored remaining space with Clear Silver Star - so lots of sparkle. Easy & fast. Santa was colored with the Red Silver Star too. All these little motifs were punched out with an appropriately sized SU round punch, adhered to inside card base. Card insert will cover this & provide a finished surface. A tiny circle mat frame around the motif would have been pretty, but as is usual with me, the idea came after I had the first image affixed. Well, there's always next time, cause for sure, these little goodies will get used again. The tiny tag & sentiment were stamped with Colorbox ink & hand cut; the larger sentiment from the set was stamped on an MStewart pre-made tag. MS border punches from a 6x6 American Crafts Kringle & Company pack & green rhinestones finished off this card.
*Got a tip to try sanding clear stamps before first use with a fine grit sand paper - so used the TH sander to sand the stamps lightly before inking. This is a good tip to get crisper images and one I had forgotten. Just something to keep in mind.
This is my project for today, concluding our week long blog hop. I have had so much fun playing with these lovely new stamps. I hope you enjoyed all the different ways each Team Member presented their projects with the stamps. Good luck to each of you in the random draw to win a set of the stamps presented during the blog!!
Just a reminder.. In order to win Tags and Trimmings, visit each blog along the hop and leave a comment. Be sure to check Jo's blog on Monday to see if you were one of the lucky winners of one of these awesome new stamp sets! Don't feel like waiting and want to grab your set of stamps now? Simply click here!
Soooo----- ready for some Blog Hoppin Fun??? I'm the last stop on hop, but if you stopped here first or got lost along the way, just start at Jo's Scrap Shack at the beginning!
Thanks for visiting today, for playing along with our 3 Twenty Crafts hop this week, and have a lovely afternoon. Hugs from me to you.
11/20/2013
3 Twenty Crafts - Borders Set
Hello my crafty friends and welcome to Day 3 of Jo’s Scrap Shack’s Surprise Blog Hop!
Today’s hop is day 3 of a 4 day hop for the new launch and release of a brand new company called “3 Twenty Crafts”!
For those of you who missed the news, Jo has decided to launch her very own company and stamp line!!! Very exciting time indeed! Every day we will show you a brand new stamp set from 3 Twenty Crafts and trust me, you don’t want to miss this!
The stamp set that we feature each day will be given away to one lucky winner, but in order to win the set you must hop along and visit each design team member’s blog, leave a comment and then comment on Jo’s blog to let her know that you have completed the hop! The winner will be randomly selected and we have no idea which blog the winner will be chosen from. So make sure to visit each blog and leave some bloggy love!
Today we are showing you the new and awesome stamp set “Background Builders”.

This is what I created using this featured stamp set.
I've not used very many border stamps, as I can never get them aligned properly (these are clear so that shouldn't be a problem with these border stamps ). Had seen a folk art Christmas tree recently and when I saw these borders, realized they were perfect to create that look. Selected several red & green SU inks, inked & stamped away on white C/S. Didn't get a very good impression on some of the stampings. Hmmm...the stamps were clearly inked well. So decided to try the Colorbox Fluid Chalk inks...worked _much_ better with the next stamping. Now ya'll may already have known that SU doesn't seem to work well for clear stamps (and maybe it was the Operator in this case!) but I didn't. I can report though, that for me the Colorbox ink worked well for a clean impression, the SU didn't.
Next I created the background using this card for my inspiration. Shirley does the most fantastic backgrounds with the DI's and Acrylic Block technique. I keep trying that, but have not achieved anything I was pleased with, as yet. I debated on using this one, created with Mowed Lawn, Shabby Shutters and Festive Berries; misted the block with water, then dragged over the c/s. This was my 3rd try, time was growing short, so I went with the last effort. Decided to stamp the twig from yesterday's Winter Wonderland set in Colorbox Creamy Brown to create a pattern on the background. MS corner punch for the holly trim, and Viva Décor Pearls for the berries on the sentiment, stamped in Creamy Brown, punched with an SU Curly Label punch. As I looked at the tree when photographing, I thought I should have distressed the outer edge of the border 'branches'. I will try this one again, use DI Tea Dye & won't that look very country & folksy???

That's it for my project for today. Hope you will enjoy the cards.
Now just a reminder....to win Background Builders, visit each blog along the hop and leave a comment! Also, all four sets that are released this week will be available for purchasing on Thursday, November 21st at 3pm and will ship out on Monday, November 25th!
Soooo are you ready for some Blog Hoppin Fun???
I'm the last stop on the hop, but if you get lost along the way, just start at Jo's Scrap Shack at the beginning!
Thanks so much for stopping by and hopping with us today and make sure to join us tomorrow for another sneak peak at another great stamp set by 3 Twenty Crafts! And thanks for joining me this afternoon, and welcome to some new followers. I will provide links to their blogs after the blog hop posts. Hugs from me to you, and have a wonderful afternoon.
11/19/2013
Winter Wonderland - 3 Twenty Crafts Tuesday Blog Hop
Hello & Happy Tuesday. Welcome to day 2 of Jo’s Scrap Shack’s Surprise Blog Hop!
Today’s hop is day 2 of a 4 day hop and the launch and release of a brand new company called “3 Twenty Crafts”!
For those of you who missed the news yesterday, Jo has decided to launch her very own company & stamp line!!! It's very exciting, yes?? Each day we will show you a brand new stamp set from 3 Twenty Crafts and truly, you don’t want to miss this!
The stamp set that we feature each day will be given away to one lucky winner, but in order to win the set you must hop along and visit each design team member’s blog, leave a comment and then comment on Jo’s blog and let her know that you have completed the hop. The winner will be randomly chosen and we have no idea which blog the winner will be chosen from. So make sure to visit each blog and leave some bloggy love!
Today we are showing you the new and awesome stamp set “Winter Wonderland”

This is what I created on my first card using Winter Wonderland.

I wanted to try out as many of these differently designed trees as I could so went for a winter forest scene, using different colors of green ink for each tree. It's hard to see in the photo, but then I used pan pastels in light blues to create snow drifts and a sky. I used a mylar stencil with some Popcorn Color Box Chalk & a sponge to do the clouds (as with all my photos, it looks better IRL!). Added some twiggy Impression Obsession die twigs(glitter snippets) along the side for the grazing deer(snippets from a small piece of Dylusions spray background), and I hope their footprints show up in the photo. Also added some coloring with Inktense pencils on the trees, some stickles for some sparkle. Shaded the deer just a bit with a dark brown copic marker.

Since there were more trees in the set that I had not stamped, I did another fast card (and I'm not fast making cards either!). Stamped this little darling with Versamark, embossed with Queen's Gold, on green patterned paper. Colored in the baubles with a Viva Décor pen after I had everything finished, added a punched glitter paper star. (Did you know punches do NOT like the regular weight glitter paper? No they do not!) Mounted the tree on a S/B circle die cut from a Kringle & Co. 6x6 (American Crafts); glued that to a larger circle from 6x6 DCWV Metallic pack. Used a green from Paper Company's Farm House 6x6 pack to emboss the card front with a Crafts Too Pine Tree Scene EF after I had die cut the circle in the position I needed. Apiece of the red pattern paper behind the tree circles covered the gap between the gold circle & green front. The sentiment is gold embossed on the same red paper & punched with SU oval; Delicata Gold sponged lightly over the embossed trees. Credit for the tree design goes to this card. Thanks Lynn, because when I saw your card, I knew one of the trees from Winter Wonderland would be perfect in this raised design.
Friends, that is my project for today.
In order to win Winter Wonderland, visit each blog along the hop and leave a comment! Also, all four sets that will be released this week will be available for purchasing on Thursday, November 21st at 3pm and will ship out on Monday, November 25th!
Soooo are you ready for some Blog Hoppin Fun???
I'm the last stop on the hop so remember if you get lost along the way, just start at Jo's Scrap Shack at the beginning! Don't forget to stop by Jo's blog to leave a comment that you have visited all the Team blogs in order to be eligible to win this so very versatile Winter Wonderland stamp set.
Thanks so much for stopping by and hopping with us today and make sure to join us tomorrow for another sneak peak at another great stamp set by 3 Twenty Crafts!
11/18/2013
3 Twenty Crafts - A New Stamp Company
Hello & good afternoon to all you lovely bloggers at the start of another week.
Welcome to Jo’s Scrap Shack’s Surprise Blog
Hop! Why a “surprise” hop? Well up until now it had to be kept as a surprise
but today…is the day another dream comes true!
Ready for the surprise? Today’s hop
is the first day of a 4 day hop and the new launch and release of a brand new
company called “3 Twenty Crafts”!
Jo has decided to launch her very own
company and stamp line!!! It's so exciting, right?? Every day we will
be showing you a brand new stamp set from 3 Twenty Crafts and you certainly don't want to miss this!
The stamp set premiered each day will be
given away to one lucky winner. To win the set you must hop along
and visit each design team member’s blog, leave a comment and then comment on
Jo’s blog and let her know that you have completed the hop! The winner will be
random and we have no idea which blog the winner will be chosen from. So make
sure to visit each blog and leave some bloggy love!
Today we are showing you the new and
awesome stamp set “Happy Harvest”

This is what I created using this
stamp set.

My first card with the new 3 Twenty Crafts Happy Harvest clear stamp set uses a Sizzix EF over one of the Dylusions backgrounds I had created earlier. Did a bit of shading on the leaves & tree trunk and some shadows around the tree & fencing. The pumpkin motif from the set was stamped on a snippet of another Dylusions background using Memento Rich Cocoa. Colored with Derwent Inktense pencils. Apples were stamped on a snippet white Xpress paper, colored with copics. Highlighted with a white Signo pen, and pumpkins & apples were fussy cut. Popped up with dimensional tape. The sentiment from the Harvest set was stamped on another snippet with Rich Cocoa, cut in a rectangle, rounded corners, edged with DI Spiced Marmalade & Barn Door. Used Antique Linen and Tea Dye to avoid the very 'white' look. Added the 2 apples and this is a finished card! I quite like it. Loved the stamps too.

Well my friends that is my project for
today. I sure hope you have enjoyed hearing the great news and I hope you are
as excited as I am about this awesome-ness!! LOL
Just a reminder.. In order to win Happy Harvest, visit each blog along the hop and leave a
comment! Also, all four sets that will be released this week will be available
for purchasing on Thursday, November 21st at 3pm and will ship out
on Monday, November 25th!
Soooo are you ready for
some Blog Hoppin Fun??? I'm the last stop on the hop, but if you get lost along the way, just start at Jo's Scrap Shack at the beginning. Don't forget to check in at Jo's Scrap Shack to let her know you visited all the Team Members, so that you can be in the running for the prize stamp set.
Thanks so much for stopping by and hopping
with us today and make sure to join us tomorrow for another sneak peak at
another great stamp set by 3 Twenty Crafts!
Also, thanks for visiting here on Carolina Cards and have a wonderful day. Hugs.
11/17/2013
Pretty in Pink
Good evening, and I'd like to welcome some new followers; I'm so delighted to have you joining me here. Please take a few minutes to surf over to enjoy these lovely blogs:
Jean (http://wwwmycraftycornerblog.blogspot.com/); Gail (http://ilikepaper01.blogspot.com/) and April (http://stampwillydesigns.blogspot.com/)
 Tonight's card is for the Pretty in Pink Challenge #22 over at a Christmas Club blog
This is a group of very talented ladies who make Christmas cards & were gracious enough to ask me to join in. I'm going to be in some very artistic, creative company, but I'll get some great inspiration I know. I've been visiting their individual blogs for a while, so I know the kind of beauties they produce.
Hot pink 4 1/4x5 1/2 piece was covered with embossed vellum. (this was a Darice Baubles EF). Hot pink gauze ribbon wrapped as a border before adhering to the pink card base. S/B Poinsettia used for the flower; leaves from a lightweight glitter paper pack, shaded with different green pan pastels, shaped with a stylus. I started with just 3 (the rule of 3, don't ya know), but it didn't look balanced that way. The same pack yielded the pink glitter paper, also shaded with some green pan pastels. My real pink or red poinsettias always have a touch of green in the leaves. I used 2 layers of each blossom die to create fullness. Orange rhinestones glued in for the center stamens.
SU sentiment stamped with Versamark, heat embossed with Ranger Queens Gold on a snippet of vellum, punched with a scalloped SU punch. Used a snippet of the pink glitter behind the vellum.
Pretty simple card, and the S/B was a NBUS for me and I don't make very many flowers.
I'll enter this card in the Christmas Card Club Admin challenge, but since I have 2 tiny snippets,
I'd like to join my buddies over at Pixie's Crafty Snippets Playground for Week 99, Part 1. Let me tell you, there are some FAN-tastic cards to see there, not to mention some good prizes for a random winner. You can leave the Head Pixie a little love, cause she is 'down in her back' and could use some good cheer, I expect. She works hard running that Snippet Playground, hunting down prizes and just keeping all the Playmates out of mischief.
So thanks for joining me on a rainy evening of what has been a very dreary day, and Halleulah, the attic workers finally left. A 'couple of hours to finish the job' has taken ALL DAY! I had to sign off that they cleaned up the work area, so I hope DH did a good inspection when I sent him up. (He's a nice guy, I have to be the hard nose at our house!) Hugs from me to you.
Jean (http://wwwmycraftycornerblog.blogspot.com/); Gail (http://ilikepaper01.blogspot.com/) and April (http://stampwillydesigns.blogspot.com/)

This is a group of very talented ladies who make Christmas cards & were gracious enough to ask me to join in. I'm going to be in some very artistic, creative company, but I'll get some great inspiration I know. I've been visiting their individual blogs for a while, so I know the kind of beauties they produce.
Hot pink 4 1/4x5 1/2 piece was covered with embossed vellum. (this was a Darice Baubles EF). Hot pink gauze ribbon wrapped as a border before adhering to the pink card base. S/B Poinsettia used for the flower; leaves from a lightweight glitter paper pack, shaded with different green pan pastels, shaped with a stylus. I started with just 3 (the rule of 3, don't ya know), but it didn't look balanced that way. The same pack yielded the pink glitter paper, also shaded with some green pan pastels. My real pink or red poinsettias always have a touch of green in the leaves. I used 2 layers of each blossom die to create fullness. Orange rhinestones glued in for the center stamens.
SU sentiment stamped with Versamark, heat embossed with Ranger Queens Gold on a snippet of vellum, punched with a scalloped SU punch. Used a snippet of the pink glitter behind the vellum.
Pretty simple card, and the S/B was a NBUS for me and I don't make very many flowers.
I'll enter this card in the Christmas Card Club Admin challenge, but since I have 2 tiny snippets,
I'd like to join my buddies over at Pixie's Crafty Snippets Playground for Week 99, Part 1. Let me tell you, there are some FAN-tastic cards to see there, not to mention some good prizes for a random winner. You can leave the Head Pixie a little love, cause she is 'down in her back' and could use some good cheer, I expect. She works hard running that Snippet Playground, hunting down prizes and just keeping all the Playmates out of mischief.
So thanks for joining me on a rainy evening of what has been a very dreary day, and Halleulah, the attic workers finally left. A 'couple of hours to finish the job' has taken ALL DAY! I had to sign off that they cleaned up the work area, so I hope DH did a good inspection when I sent him up. (He's a nice guy, I have to be the hard nose at our house!) Hugs from me to you.
11/15/2013
Friday Fun Day Challenge #26
Hi and welcome to another Friday Fun Day at Jo's Scrap Shack, where our sponsor for Challenge #26 is Fitztown Digi Stamps. I chose Wild #8 (here) to use on the card for today's Anything Goes theme.

- Wild #8 was colored with copics using a snippet of Copic Xpress paper. Used BG0000 as a base color. Chose various earth shades for the brownish fur tones, then started adding in some warm grays. Changed to cool grays where I thought those would look better. Printed out a color photo of a wolf to see as I colored. Used some Silver Star gelly pen around in places just for a little sparkle - and oh yes, on his icy blue eyes.
- Die cut image with a S/B deckled oval, and smudged DI Iced Spruce around the edges. Used BV0000 to shade the image background, switching to BV01 for the shadow around his head.
11/14/2013
Malware
Good evening. Just wanted to make a quick post to add some info to an earlier post comment I had made regarding an article I had read about some
very nasty malware that is hitting computers. Here's a link to an article I just read, describing how this vicious software works. Hope it will save someone's computer ...
http://www.today.com/money/nasty-new-malware-locks-your-files-forever-unless-you-pay-8C11511655?gt1=43001
If you have time, it might be good to read through the article, because I couldn't really remember all the specifics as I made the post. Just that it was extremely important to back up ALL your computer files, not just the normal system ones.
G'night.
Memory Box Grand Gothic Window
Good morning & Brrrrr! We had our coldest night to date, and were thankful to have our heat back on after it was turned off by some fellas doing work in our attic yesterday. It's a cold day outside (low 40's - but very sunny). The window installers are finishing up the window job and should be done soon...they are doing the caulking, wrapping & sealing efforts.
A warm welcome to 2 new followers: Karen Petit(http://stampinginpink.blogspot.co.uk/) and Gibmis (http://colledgeangel.blogspot.com/)/. Please do take an opportunity to pay these lovely bloggers a visit and enjoy some talent. And thanks, ladies for joining me.
We had a gorgeous sunset on Tuesday evening. I was able to get a picture of it to share.

Aren't these colors absolutely stunning? It took our breath away to just stand on the deck and enjoy this display. As you can see, some of our neighbors' trees still have leaves, but are losing more day by day. Especially that night as there was a strong biting wind.
Here's today's card:

- Memory Box Grand Gothic Window cut from navy blue (darker than it photographed). Background is scrap paper from the airbrush table. This is paper from a large desk calendar that was placed on the desk to protect it from the sprays. (a snippet cut from a heavily sprayed bit of the scrap paper) I thought the colors were pretty, like a stained glass window. Probably should have ironed the paper before I adhered it to the window frame, as it is a bit wrinkled looking.
- Darice woodgrain EF inked with Memento Rich Cocoa and then lightly smoothed Hero Arts Wet Cement Shadow ink over the Memento just in places - not over the entire folder. Using the 2 colors gave a nice variation IRL on the wood texture. Loosely woven ribbon was a 50% item from Hobby Lobby.
- Penny Black die for the sentiment, which came from the same snippet as the window background.
Think I'll quickly dash over to Pixie's Crafty Snippet Playground, where it's week 98, loads of gorgeous cards to inspire and additionally a Wow prize too! Won't you join us?
It's going to be another busy busy here, but I hope to get back to the pc to do some visiting of those who have been here to browse around the last 2 days. Ya'll stay warm & cozy, and as always, thanks so much for popping in here. Hugs from me to you.
11/13/2013
Winter Village
Hello and welcome; it's hectic at our house. The window installers didn't make it Monday, but they did show up on time Tuesday (and they did call Monday to reschedule. So although I was irritated, I got over it, and was grateful at least they didn't leave us sitting home waiting for them to show up!). Good progress is being made.
I've been seeing so many beautiful white on white scenes around Blogland lately, so I thought I'd try one. I also like the torn white layers used on many of these cards, so tried that effect on the one shared today.

- first layer was an Impression Obsession tree die that is the very small background trees. This die goes with a stamp (which I didn't see when I bought the die). Adhered the die cut to a torn strip, then used dimensional tape to pop up from the card base.
- Next layer is Memory Box Winter Village - house & bare branched trees. Glued this piece to torn strip, then popped it over the first tree layer.
- torn layers of white textured paper; used Ranger Star Dust Stickles over the torn edge, then sprinkled coarse MS glitter. Each layer was popped up on the card, stickles & glitter being added to the layer, then dried before adding additional layers.
Once I had all assembled decided to die cut the taller tree, and was able to slide it behind the very first layer so that it hopefully appears at more of a distance! This is my very first all white card, and you can see some of my inspiration cards here, here and here. So please do give yourself a huge treat and check out these lovely cards.
Thanks for joining me today. I will try to edit this scheduled post later for 2 challenges I'd like to submit it to, but as this is a scheduled post, I'll have to do the linking when the post goes live. Hugs to you from me. Have a wonderful day.
Edit: As promised back I am to link this card with Craftyhazelnut's Christmas Challenge 150, where the Christmas theme is "outdoors'. and also submitting to Craftyhazelnut's Christmas Challenge Extra. This one is not strictly a Christmas card (yet!), but it could be, with a silver Merry Christmas sentiment sticker added at the bottom;, it IS an outdoor theme, so I hope it will qualify. I can see there are already lots of entries, so if you have time, pop on over to Hazel's to enjoy some of these delectable cards.
*******
And yes it's been a very busy day here at our house. It's supposed to be 25F tonight. The guys working in our attic, turned off our heat. We didn't realize this until about 5:30 this evening, as folks were coming in & out all day with the windows, attic stuff going on. So when I felt cold, I just thought it was because they kept leaving doors open. Right about dark I felt cold enough to go bump up the thermostat and realized it was OFF! We've never had to do anything to turn on our heat, except turn on the thermostat. So DH had to go upstairs to the attic where the furnace part of our system is, and find the switch to turn on the thermostat. He thought he had done it, but then nothing was happening. Thought we'd have to call the heat/cooling system guy out here on a night call - think very expensive house call! - because we didn't want to have frozen pipes over night with no heat in the house. I was perturbed that the guys didn't tell us, or if they didn't realize they'd turned something off, that's even more unsettling. When we do this kind of thing, we always encounter Murphy's Law. On the other hand, the window guys have done a really nice job, worked efficiently, and would have been finished this afternoon, except they had a late arrival. One of the crew had frozen pipes! And oh yes, the door that was delivered, was not what we had ordered, so we refused to accept it. But that wasn't the installers fault! Oh happy day. And yep, we've built 2 houses, so we know this is part of the routine. We did some total kitchen remodeling in our first house, and yes, that kind of thing happened with that deal. You survive it and laugh about it - much later!!! Hugs & stay warm if it's cold where you are.
11/12/2013
Northwoods Thanksgiving
Good morning & thanks for stopping to visit. Today's card share was done with a beautiful Northwoods stamp, borrowed from a friend. Northwoods stamps are among my favorite to use as they always give such a sharp clean impression and this company always has such classic themes. My friend & I both love Northwoods and are lucky to be able to swap & share our stamps, doubling the use of them.

- Northwoods image, colored with copics. It was a joy to color, very easy & fun to work with this beautiful scene. Die cut with a Sizzix circle die, as it was the appropriate size to cut, whereas the S/Binder small & large circle dies didn't quite fit.
- Mat was a Dylusion sprayed background that had similar colors to the image. Trimmed and used an MS corner punch. Added corner pearls. Matted again on black. Used some papers from 2 12x12 packs that complemented the image colors. Added a bit of DI Dusty Concord to smudge the edges of each paper, a leaf pattern ribbon to hide the join. Bob's yer Uncle, and it was done.
This will be a scheduled post, so once again, thanks for visiting, and have a wonderful day. Many hugs
11/11/2013
Shells
Good morning, happy Monday, and welcome. Had a phone call that our installers are picking up the windows, loading the trailer and heading to our house. Hooray. Hope they get a lot done today, as it's supposed to get colder in our area as the week progresses. We were told it would probably be a 2 to 3 day installation for 22 windows & one replacement door. The windows will be on our main floor - so on one side of the house, the guys will be able to stand on the ground, the deck or the front porch. On one side of the house, they will have to be on a high ladder. One window is in the attic room, which to be accurate, I should say is a 3rd story, so if they have to be outside working, they're gonna be real high up!!! We're not sure if they will have to be inside the house or if they insert the window from outside. We were going to pick up some stuff that might be in the way if the work is done inside the house, but decided to wait until they get here, let them tell us what we need to move. We also have window blinds and valances on most of the windows, so are not sure how much of that has to be removed...if they remove it, or if DH must.
OK, here's the card share for today:

- 3D Mbossibility Shell Beauty folder on cream card base, enhanced with DI Antique Linen over the raised areas very lightly. This folder gave a really deep emboss, but I didn't see any places where it cut through, even though this was Recollections paper, not very heavy weight. I was pleased at how well this one embossed.
- Stamped a couple of shells as the front seemed very plain, and I liked the shells placed on the front. I used a snippet of Xpress paper for 3 shells (only used 2 of them here). Colored with various shades of copics in pale yellow, pinks, blue violet & pale browns, trying for a shell that looked like what we used to find on the beach in Florida. Cut the shells out, then I had the idea to spread a pearl colored Liquid Pearl over the shell to create the glossy shine of a real shell. I liked the effect, but I got more product on the shell than I intended. Spread with my finger, but the LP dried fast, so it was hard to smoothe off as much as I wished. It also emphasized the pink-y tones I had used, and I'm not sure I like this against the cream & tan of the card base. Before the addition of the Pearls, the shells had more of a brown tone when I had placed each against the card.
A small sentiment may go in the center of the embossed shell when I use the card, or I may leave it plain, and put the sentiment inside.
Have a wonderful Monday, thanks for visiting. Hugs from me to you.
11/10/2013
Amuse Birds
Happy Sunday, and it's lovely to have the sunshine back around our neighborhood, after yesterday's glooms. We have window installers coming tomorrow (?hopefully? ...it's scheduled but we all know how that can go, don't we?). I'm trying to get a few cards posted ahead, in case I can't get to the computer.
Some time back, I had left a comment at a blogger who handles Amuse products. I wanted the flying birds I've used here, but shipping from the Amuse site for these tiny little birds, cost more than the dies themselves. The blogger very kindly sent me this set and charged me only the actual postage (which wasn't that much). Did I ever appreciate her doing that! Finally had time to hunt up the die and use it.

Some time back, I had left a comment at a blogger who handles Amuse products. I wanted the flying birds I've used here, but shipping from the Amuse site for these tiny little birds, cost more than the dies themselves. The blogger very kindly sent me this set and charged me only the actual postage (which wasn't that much). Did I ever appreciate her doing that! Finally had time to hunt up the die and use it.

- Amuse bird die, Darice Birds embossing folder, Elizabeth Craft sentiment. The large bird is the die cut and the smaller elevated bird is the positive piece from the darker blue paper.
So many visitors left such sweet comments on the white card I did Friday, that I thought I'd see how it would work to use a light blue colorway. I'm really into the autumn colors at the moment, but blue just seemed better for these lovely birds. I saw this die used on a hot pink card, with just the one bird, no other embellishment at all, and thought it was so elegant & lovely. I did a bit of shading on the smaller bird, the outside of the raised panel, and at the last moment, added a tiny blue rhinestone for the bird's eye. Not sure about that eye!!!
- On another note, I saw on the MSN page last week about some new malicious software that one can pick up cruising the net. (my understanding of the article was that when downloading something that seems safe, the malware could be attached to the file...not sure if this is correct). You can clean off the malware, but it is set up to lock files that can't be reopened. Supposedly this was a legit warning, not some of the hoaxes that go around in email. Apparently some businesses have already been infected. I backed up our pc, so passing along the info to anyone who does not do such. Apparently the infected computers can be cleaned of the malware, but if you don't have backups of your files, you could lose them.
Ya'll have a wonderful Sunday. Our afternoon is going to be busy moving things back from some of our windows so that the installers don't have to do that, and can (?hopefully?) work a bit faster!
Many hugs and thanks for stopping to visit.
11/09/2013
Turning over a New Leaf
Hi & welcome on what has become a rather gloomy afternoon here at our house. The day started off very pretty & sunny, but now is looking as though it could rain at any moment. (None has been predicted however). DH is out raking up some leaves that he blew into a pile yesterday afternoon. My suggestion was to just run the mower over the leaves, let them mulch into the yard. He must be really bored, cause neither of us likes raking leaves. Somebody in the neighborhood is burning, so - HA HA - I can't go outside to help!!! Bad me.
The image on the card today has been colored for a while, and I got round to matting it for a card last night.

- Stampability House Mouse - Turning Over a New Leaf - colored with copics, edged with DI Stormy Sky, then again with Faded Jeans. The distressing looks much darker IRL. Die cut with S/B Label 11, then faux mat from a Dylusions piece that was handy. I liked the reddish tones of the mat against the blue distressing. I am never happy with my coloring on the HMice if I use the brown tones. I seem to do much better if I stay with the grays - not sure why this is so. I did like the way the leaves in the image turned out.
11/08/2013
Friday Fun Day at Jo's Scrap Shack
Good Morning, and welcome to Friday Fun Day Challenge #25 over at Jo's Scrap Shack where our sponsor is Bugaboo Digi Stamps. Our team member, Kellie selected a theme of Things with Wings. I chose the Bugaboo Silhouette Butterfly Flowers (shown here).
Printed out the digi on plain white Walmart GP paper, because I had decided I would airbrush or use pan pastels on this image. So here it is:

I have been so inspired lately at seeing so many bloggers using a raised white panel against a white card base, so thought I'd give it a try with this image. Die cut the image with a S/B circle that fit around the image.
- Bugaboo Butterfly digi airbrushed with copics, starting with a base of Y04 because I wanted to have a center glow. Used B000 over the yellow trying to leave the center with more yellow tones. I kept experimenting with the different B markers until I got the look that I had envisioned. I didn't want to use the markers directly to the paper, even though I'd let the digi print dry well. Sometimes I have had the print smear using alcohol markers, even on the quality Xpress paper. GP paper does not usually work well for me, if I'm using Copics direct to paper. I did a second image using Pan Pastels, but didn't like it as well as the airbrushing. You might see it later, after I look at the results for a little while and think about it!
11/07/2013
Christmas Baubles
Good afternoon on abusy day that is winding down. Had a dental appointment this morning, so had to be out early. This card got finished last night, so here 'tis:

- Previously created Dylusions background using Funky Fuschia, Bubblegum Pink & Cherry pie. (and maybe a touch of London Blue that had been diluted with white linen). Some of these were full strength, then resprayed lightly with the White Linen dilution of the same colors.
- Couture Creations EF (Baubles & Baubles) over the sprayed background. Gelato gray smudged over the ornaments (I thought it was silver!), then colored the hanging dots & ribbons with a pentel silver pen. After rummaging through the box where the Gelatos are kept, I found the silver and rubbed it over the previous gray. IRL it does look a bit more silvery.
- Elizabeth Craft sentiment, from lightweight silver glitter, 2nd one from a snippet of previously created Dylusion background which had a pinkish tone. I thought it might work to have a shadow effect behind the first die cut, but after I had it adhered, I'm not real pleased with this. Don't think I'll do it again.
- Paper Studio textured silver paper cut for a card base cover. Pink rhinestones added on each ornament.
This was a pretty fast card - for me anyway. I like to do my 'experimenting' on one like this, rather than on one where I've spent hours coloring of an image. Then when I mess it up, it's more frustrating.
Submitting to Crafty Hazelnut's Christmas Challenge Extra, where it's anything goes, as long as it has Christmas as a theme.
Thanks for joining me this afternoon. Don't think we have any errands to run tomorrow (of course DH can change that plan!) so I hope I can get down in my stamp area (guess I should say Studio?) to do some putting away. I just spent 15 minutes looking for this folder so I could provide the specs. It was on my desk, under a pile. I spend more time searching for supplies, than I do anything else! LOL & plenty of hugs.
11/06/2013
Thanksgiving Covered Bridge
Hello and thanks for visiting this afternoon. Today's card used an Impression Obsession image, colored with Copics. Then I decided to try again to make a trifold card (?is this called gatefold?) and I am still undecided if I'll leave the bellyband closure on it.

Above is the outside of the card, and papers used were from a 6x6 My Minds Eye pack, with a Cheery Lynn Kiwi Oval Frame (DL123) inner swirl on one side, and a motif cut from a Graphic 45 French Country Collection 8x8 pack. The border band was from a new MS deep edge punch. It may not stay with this card, but I was trying to devise a closure. The card base is a chocolate brown from a Recollections Neutrals pack.

- interior of the card; Impression Obsession H1781 red cling stamp, die cut with S/Binder Label 7, edged with DI Vintage Photo, Burlap and Stormy Sky.
11/05/2013
Winter Cardinals
Hello and thanks for visiting today. Today's card was created with a certain blogger in mind, and I hope she'll enjoy these pretty cardinals. She's had a bad fall, is recovering, and I hope these bright birdies will bring a bit of cheer.

- Sweet Stamps Cardinal Pair stamped on Xpress paper, colored with Copics, with a little Spica pen added for some glitter on the pine needles. Sakura Clear Star on the ornament. Airbrushed BG0000 background.
- S/Binder Adorning Square die cut, smudged with DI Iced Spruce around edges of the die.
Red matting made by tracing outer edge of the die on a sprayed Dylusions background.
- Card base Dylusions background created using Postbox Red, London Blue, Cut Grass, Tattered Angels Moonbeam and a gold spray. I spray the Dylusions, let the colors marble, then add some glitter spray. I have found it works better for me, if I tilt the Canson #90 water color cardstock, let the colors run to marble. While drying, I spray some glitter sprays, let the drying continue. I've used a heat tool to dry, but I like the effects better with the natural drying.
- edged the clear sentiment (snippet) with the Iced Spruce while still in the die, added some red rhinestones, the red gauze bow, a pearl, and it's done.
DH just informed me that this looks like a Christmas card. I was so focused on the cardinals, I forgot about the ornament! We're still gonna call this a Winter card!!! Give yourself a big hug from me!
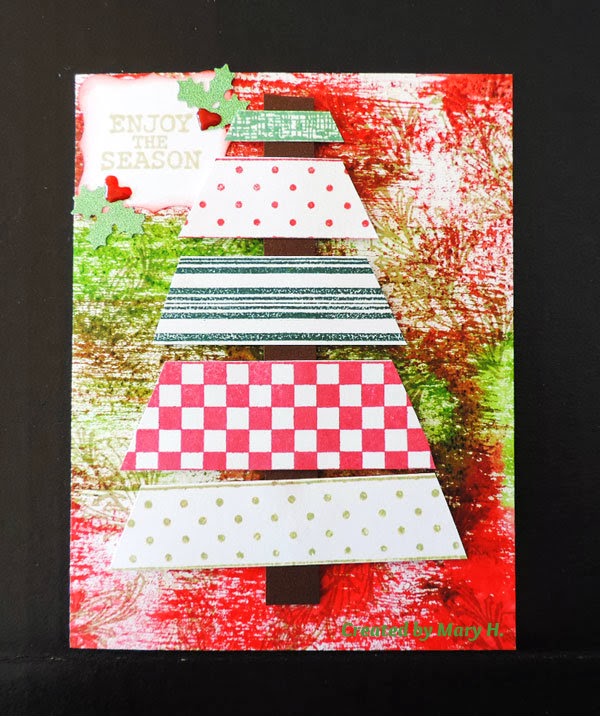
11/04/2013
Thanksgiving Pumpkins
Good Morning & here we are at the start of another week, with another Thanksgiving card to share. I realize this USA holiday is not celebrated everywhere, but I hope you'll enjoy these cards anyway. I'll be sharing quite a few, since that is my project for the early days of November. The most difficult part of this card was the Cheery Lynn sentiment. I've been trying to find different holiday sentiments in my travels, so when I saw this one at a vendor booth, it was a no-brainer sale. However, I must say, it was not easy to adhere it straight, and I don't think the "T" in Thanksgiving looks very nice when cut out. It's a bit 'too fancy'...I think it would look nicer without all the scrolls & swirls. It cut nicely, but hard to glue down.

- Die cut Cheery Lynn Fall Harvest 2(FRM122) in a lightweight black paper, and I remembered to use the metal shim. Pleased to say it cut beautifully and all the little pokeys fell right out.
- background is from a waste paper salvaged from spraying the ribbon on this card. As I looked at the snippet* of waste paper on the airbrush desk, I thought it would make a good background for this die; Voila, the card practically made itself! Derwent inktense pencils used for shading on the pumpkins, which did not show up very well in the green bits. Hunted up an Olive Green Spica pen, and this coloring medium showed much better.
- tiny orange rhinestones for a bit of bling; added a few green rhinestones at the bottom, once I had the Cheery Lynn sentiment adhered.
Hope you enjoy this one, and that your Monday is off to a smashing day. Thanks for joining me here, and many hugs.
*Edit: It just occurred to me I have a big snippet used as the background here, so off I go to share this at the Snippets Playground, Week #97. Check it out!!!
Subscribe to:
Posts (Atom)